

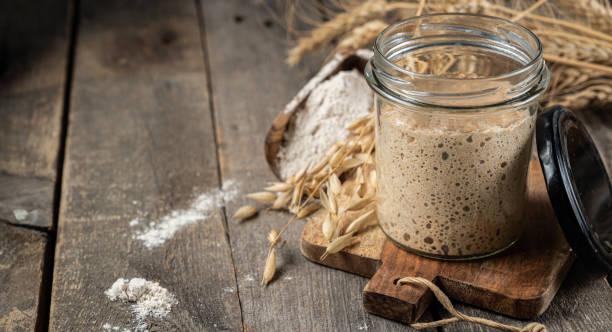
You can try skipping it. People do. But honestly, a banneton proofing basket changes the whole game for homemade sourdough bread. It’s not just about looks, though yeah, those spiral patterns are nice. It’s about structure, support, that final rise where your dough either behaves… or turns into a flat, sad pancake. A banneton holds the dough in shape while it proofs, simple as that, but also not that simple. It manages moisture, gives the crust a head start, and keeps your loaf from spreading sideways like it gave up halfway. Without it, your homemade sourdough bread might still taste okay, but the texture and form just won’t hit the same. And no, a bowl with a towel isn’t quite equal, it works in a pinch, sure, but once you try a proper basket, you’ll feel the difference right away.
What Actually Happens During Proofing (And Why It Matters)
Proofing isn’t just waiting around for dough to rise, there’s real stuff happening in there. Fermentation continues, gases build up, gluten relaxes, the dough shifts from tight to airy. It’s a delicate phase, and small mistakes here can mess everything up later. With homemade sourdough bread, this stage matters even more because you’re relying on natural yeast, not instant stuff that fixes everything quickly. If your dough spreads too much during proofing, you lose that oven spring, and the bread comes out dense, heavy, kinda disappointing honestly. A banneton proofing basket supports the dough during this stage, gently holding it in place, not forcing it, just guiding it so it rises upward instead of outward. That small difference turns into a big one once it hits the oven.
The First Time You Use a Banneton (Yeah, It Feels Weird)
Let’s be real, the first time you flour a banneton and drop your dough in, it feels wrong. Like you’re about to ruin everything you just worked on. Sticky dough, flour everywhere, second-guessing every move. But here’s the thing, it works, even if it feels messy. You dust it with flour, rice flour helps a lot here, place your shaped dough inside seam side up, and just let it rest. That’s it, no magic tricks. When you flip it out later, something kinda satisfying happens, the dough holds shape, you see those rings, it looks like actual bakery bread instead of something random. Not perfect, maybe a little uneven, but real, and that’s the moment you realize yeah, this tool actually matters more than you thought.

Choosing the Right Banneton Proofing Basket for Your Bread
Not all bannetons are built the same, and you’ll notice that pretty quickly once you start looking. Some are round, some oval, some made of cane, others from wood pulp or even plastic, though those feel a bit off to be honest. If you’re just starting, go with a classic round cane banneton, it’s forgiving and works well for most homemade sourdough bread recipes. Oval ones look great, especially for batards, but shaping can get tricky if you’re still figuring things out. Size matters too, a basket that’s too big won’t support your dough properly, too small and your dough just spills out awkwardly. Around 9 inches is a safe place to start for a standard loaf, not perfect for everything, but it works for most cases until you get a feel for it.
Flouring the Banneton: Where Most People Mess Up
This is where a lot of people slip up, either they use too little flour and the dough sticks like glue, or they go overboard and end up with a dry, floury crust that feels off. Rice flour is your best option here, it doesn’t absorb moisture the same way wheat flour does, so it creates a better barrier between dough and basket. A light, even coating inside the banneton is enough, you don’t need to dump flour into it like you’re coating fried chicken. Also don’t forget the dough itself, a small dusting on the surface before placing it in helps a lot. It’s a balance thing, not perfect, just enough to avoid disaster, and yeah, you’ll probably mess it up once or twice before getting it right.
Shaping Dough Before It Hits the Basket
Here’s the truth, the banneton proofing basket doesn’t fix bad shaping, it helps, sure, but it won’t save sloppy dough. If your dough is loose going in, it’ll still be loose coming out, just slightly better contained. You want surface tension, that’s the key. When you shape your dough, you’re stretching the outer layer just a bit, creating a kind of skin that holds everything together. That’s what traps gas and gives your homemade sourdough bread that nice rise in the oven. Skip this or rush it, and you’ll see the results right away, flat loaves, weak structure, not great. It’s one of those steps that feels small but actually carries a lot of weight.
Cold Proofing vs Room Temperature (Both Work, Kinda)
Some people swear by room temperature proofing, others go straight to the fridge for overnight cold proofing, and honestly, both methods work, just in different ways. Cold proofing gives you better flavor, slower fermentation builds more complexity, and it also makes the dough easier to handle, less sticky, more controlled. Room temp proofing is faster, good if you don’t want to wait forever or just need bread the same day. A banneton works for both, no problem there. Just make sure you cover it properly so the dough doesn’t dry out, plastic bag, cloth, whatever works. It’s not about strict rules, it’s about what fits your routine, your patience level, and how much planning you feel like doing.
Getting That Classic Spiral Pattern (It’s Not Magic)
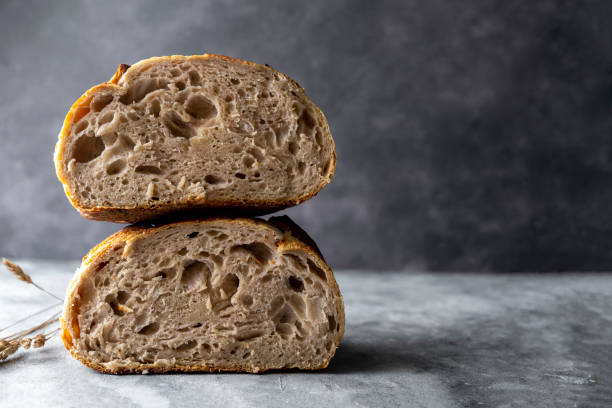
You’ve seen that spiral pattern on sourdough loaves, looks impressive, almost like something complicated went into it. It didn’t. It’s just the imprint from the banneton. If you want that pattern visible, skip the liner and flour the basket directly, then place your dough inside. When you flip it out, the rings show up naturally. If you want a smoother finish, use a cloth liner instead, gives a cleaner look but no pattern. Either way, the bread tastes the same, this part is mostly about how it looks. Still, there’s something satisfying about seeing those rings on your homemade sourdough bread, makes it feel like you did something right.
Transferring Dough Without Ruining Everything
This is one of those moments where things can go wrong fast if you hesitate too much. Your dough is proofed in the banneton, ready to bake, now you need to get it out cleanly. You place parchment paper over the basket, flip it, and gently lift it off, that’s the move. Sounds easy, but if your dough sticks or collapses, it’s frustrating, no way around it. A well-floured banneton proofing basket helps a lot here, and so does confidence, weirdly enough. If you move too slowly or second-guess, things get messy. Once it’s out, score it right away and get it into the oven, don’t let it sit around too long, timing really matters at this stage.
Cleaning and Maintaining Your Banneton (Don’t Overdo It)
People sometimes treat their banneton like it needs constant cleaning, but that’s not really how it works. Don’t wash it with water after every use, that actually causes more problems than it solves. Just let it dry completely, then brush off the excess flour, that’s usually enough. If it gets really dirty, a quick rinse is fine, but make sure it dries fully before storing it. Moisture is the real issue here, if you leave it damp, it can grow mold, and yeah, that’s as bad as it sounds. Keep it dry, keep it simple, don’t overthink it, it’s a tool, not something fragile.

Common Mistakes That Ruin Homemade Sourdough Bread
There are a few mistakes that show up again and again, overproofing is a big one, dough rises too much and collapses in the oven, leaving you with flat bread. Underproofing does the opposite, dense, tight crumb, not great either. Using the wrong flour in your banneton proofing basket leads to sticking issues, poor shaping leads to weak structure, and not preheating your oven enough kills your oven spring. It’s usually not one big mistake, more like a chain of small ones stacking up. But once you fix a couple of these, things improve quickly, not perfect, but noticeably better.
Why Homemade Sourdough Bread Is Worth the Effort
It’s slower than buying bread, messier too, and sometimes frustrating when things don’t go right. But there’s something about making homemade sourdough bread yourself that just feels different. The smell, the crust cracking, the uneven shape that still somehow looks right, it all adds up. A banneton proofing basket isn’t the only tool you need, but it’s one of those things that quietly upgrades everything without making a big deal about it. After a few bakes, you start noticing the difference, and yeah, you probably won’t want to go back to skipping it.
Final Thoughts: Start Simple, Then Improve As You Go
You don’t need a perfect setup to start baking homemade sourdough bread, just a few solid tools, some patience, and a willingness to mess things up a bit along the way. Start with a basic banneton, learn how your dough behaves, adjust as you go, there’s no single right way here. You figure it out by doing, not by overthinking every step. And once it clicks, it really clicks, the process feels natural, not forced. If you’re ready to take it seriously, even just a little, then yeah, it’s time to stop guessing and start baking properly.
FAQs About Banneton Proofing Basket and Homemade Sourdough Bread
What is a banneton proofing basket used for?
A banneton proofing basket supports dough during its final rise, helping it maintain shape and improve overall bread structure before baking.
Can I make homemade sourdough bread without a banneton?
Yes, you can use a bowl with a floured cloth, but a banneton gives better shape and more consistent results.
Why does my dough stick to the banneton?
Usually because of not enough flour or using regular flour instead of rice flour, which prevents sticking better.
How long should I proof sourdough in a banneton?
It depends on temperature, but typically a few hours at room temperature or overnight in the fridge.
Do I need to clean my banneton after every use?
No, just let it dry and brush off flour, washing is only needed occasionally.